|
Here is a lesson I learned the hard way and years too late, so I'm gonna tell you all right now: 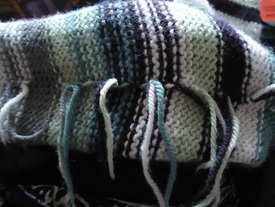 Leave long tails and weave in your ends! You know what I'm talking about - this is the first and last instruction on any knitting pattern. You especially need to do this when changing yarns throughout your work, but, yes, also at the beginning and ends. This is not just because of unsightly knots on scarves - I used to think that if I was knitting a hat or a sweater, that I could just knot the two yarns together on the inside and cut the ends short. Nonononono. This leads to holes and unhappiness and knitted objects of little integrity. I made my mom a sweater for her birthday (or maybe Christmas?) once, and she came to me with it a few months later full of holes! Totally embarrassing, especially since I told her the thing was machine washable - the yarn was fine in the machine, it didn't shrink or bleed, but my shoddy craftsmanship made it not-so-washable. Granted it was made of a particularly slippery yarn and there was a lot of color changing throughout the sweater, but this could happen to just about any piece. 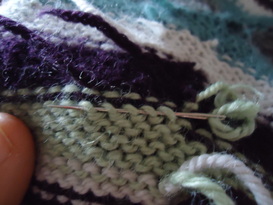 So here is a sort of tutorial, for those, like myself who knit on the fly and might only recently have learned to read patterns an might not have always know what it means to weave in ends and why, and sometimes like to ignore rules when i don't know their purpose. In the above photo is the inside of a sleeve revealing all the naked ends. Remember, leave them long, at least 3 inches, so that they can be threaded into a needle and treated right - you can always trim them (a little) later. To my left here is one of those ends being woven back into the piece. Use a tapestry needle and just go through the tops of a row of stitches, making sure that it doesn't show on the face of the piece. This is pretty easy if you go across a row - if you want to travel down a column of stitches (works well if you are weaving ends into a rib) then you want to skip every other stitch, or it will definitely show on the face of the work; you will essentially just be transfering the end to the front of the work :/ I usually try to weave through a stripe the same color as the yarn end to be double sure. 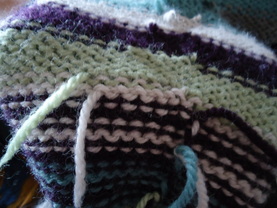 To the right you can see a couple of properly woven ends - green through a green stripe and white through a white stripe. You can also see some already trimmed ends in the top of the picture. And lastly, down below is the finished product - once you've woven the ends through an inch or two of fabric, you have my permission to trim what is left dangling (be careful not to snip and stitches though). Now go forth and be happy knitters, confident in the fact that you are knitting pieces of art that will endure for longer than they would have when you were in that nasty habit of snipping so close to the knots (or was that only me? <3 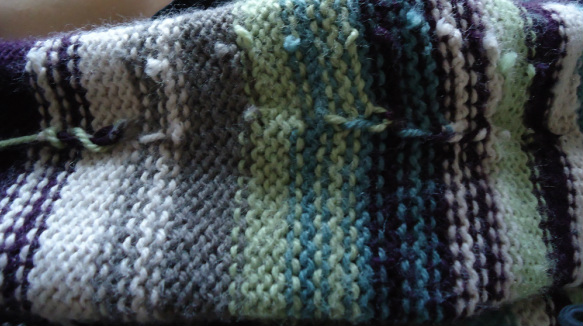
0 Comments
I have been wanting to get back into the game for a while, but I was inspired to start up the ol' blog again when a friend who has only recently gotten into knitting asked me if I had any pictures of my projects. I found myself feeling overwhelmed at the very thought of all the unfinished projects I have lying around my apartment, but I decided it was high time I pull them all out of their boxes, bags, cupboards and suitcases, and do something with them. And I'm happy to say i've already finished one of them and am close to a second. But first, here is my pile, arranged for dramatic affect: 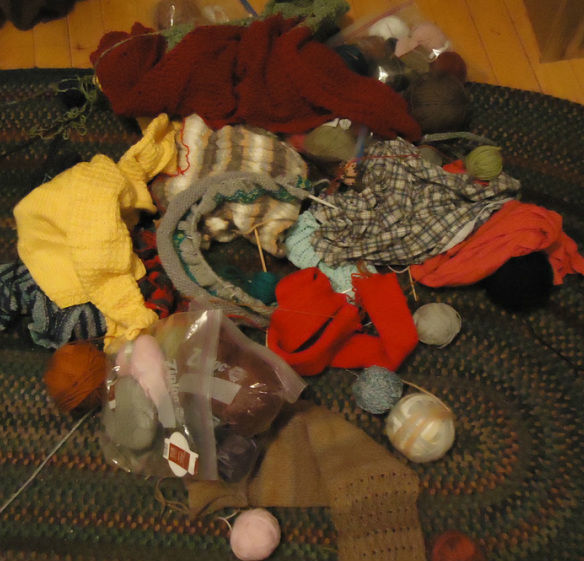
So I now know I am the proud owner of more than 30 unfinished knitting projects. And those are ones I have actually started - I probably have another thirty that are still in the imaginary stages, which in some cases I own the yarn for, and have partially or fully designed the pattern, but it may never leave my computer. Ugh. That said, let's celebrate something that is finished, and finished today! Here is an earthy sort of sweater that knit up pretty quick, even though I started it well over a year ago - I got side-tracked, see my other 30 unfinished projects. Like most of my creations, it made itself up as i went along - one way in which I think knitting and writing are very much the same. The original idea for this sweater was to mimic one seen in an episode of Angel, worn by Cordelia. Her sweater in that episode was a pretty simple brown thing, but the sleeves were only attached to the body by a few stitches in the middle of the arm, making the sweater kinda sexy and also prime for armpit ventilation. So I set off with the plan to replicate this Cordy's sweater. I started the sweater as i generally do, from the neck down in a seamless, raglan sleeve design. When I separated the sleeves from the body, I bound off the sleeves except for 4 stitches in the middle of each, which I held with a safety pin. Then things started to change for me. I got bored with stockinette stitch halfway down the body, and opted for some lace detail, so I've got a simple lace/ cablesque thing going on, with 3 rows of k2/p2 rib and then one row of k2 tog, yo, p2 alternating with yo, k2 tog, p2 so that the holes switch sides of the rib (sorry guys, I realize that most of the people who are going to read this are not knitters, and this falls into the mumbo jumbo category. Also, if you are a knitter and are considering replicating this lace pattern, know that I don't know the difference between k2 tog and k1 sl1 psso - I just put whichever stitch I want in front and k2 tog for either). So here's that lace: 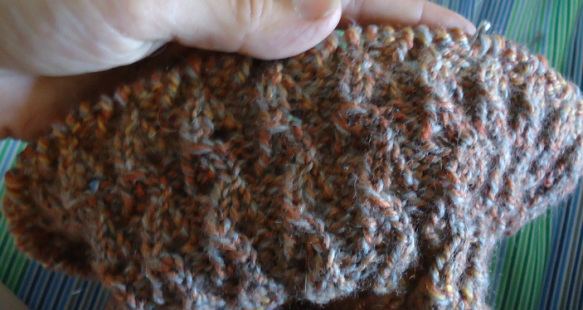
Also, you'll notice that in the finished picture (down below) I do not include the awesome sleeves, which were the whole point of making the thing to begin with. Well, I did add them, or begin to add them anyway. But I tried it on with the sleeves and decided that they were kind of lame. I ended up loving the sweater i ended up with, but it doesn't really represent the original vision at all. Funny how life is sometimes. 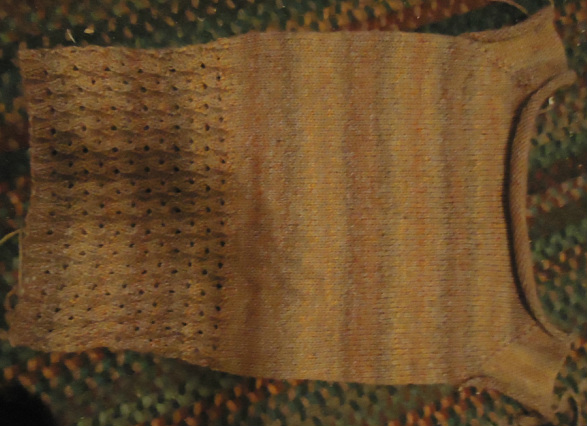
I'm realizing that I don't really like knitting the arms of sweaters. They are boring tubes that go on forever, and then you have to make a second one. The body of the sweater can get kind of boring too, but you don't have to pay very much attention. Arm, on the other hand, tend to be tapered, so I have to decrease every 8 rows or so. Damn, this topic is even boring.
Anyway, I have 4 sweaters lying around that need arms. The good news is that I finally finished Vincent's bomb sweater (I had been working on the arms for a month or so, here and there). It came out pretty well. I'll have pictures as soon as I find my camera cord. Additionally, I've been re-arming a sweater that I made a little over a year ago, before I fully realized how essential tapered arms are. The previous arms would really accentuate the flapping-ness of old-lady biceps. But I'm not really into that. It's practically my job - I can't help but accumulate hobbies and obligations and etc. etc. Anyway, I'm writing a book on knitting - not just on knitting, but a comprehensive book on knitting, from beginner to advanced. Below is my table of contents - let me know what you think (and if I'm missing anything key).
CH1: How to Knit: The Scarf: Basic Scarf: Choosing your yarn, Casting on, Knitting, Binding Off, Weaving in ends, Fringing Variation 1: Checkerboard Scarf: Stockinette Stitch, Knitting and purling together Variation 2: Crenellated Scarf: Binding off and casting on throughout your work CH2: Oops! Common Mistakes and a Drop-Stitch Scarf: Mistakes: Adding stitches, Dropping stitches, Subtracting stitches, Splitting yarn, Tension, Twisted Stitches Drop-Stitch Scarf: Dropping stitches on purpose, Drape Variation 1: Alternating Drop Falls, Design CH3: How to Knit: The Hat: Basic Hat: Casting onto a circular needle, Ribbing, Decreasing, Pompoms Variation1: Reversible Hat: Casting onto double-pointed needles, Increasing, Double hat CH4: Things You Didn’t Know You Knew How to Make: Blanket, Dishcloths, Leg Warmers, Hand Warmers, Bow-ties and Neckties, Please Experiment CH5: Tricky Things: Multi-color Knitting, Lace, Cables, and Reading Knitting Patterns: Fair Isle Hat: Knitting with two colors, Knitting charts, Make your own knitting charts Lacey Scarf: Knitting Terms Cable Hat CH6: How to Knit: Mittens and Sweaters: Basic Mitten: The cuff, Shaping to your body, Gusset, Separating the thumb, Finishing palm, Finishing thumb Basic Sweater: Gauge and Swatches, Collar, Yoke, Separating arms, Body, Waist, Arms, Cuffs Variation 1: Cardigan: Straight on circular, Button holes, Buttons Other Sweaters: Seams, Sewing for knitters, Crochet for knitters CH7: Small Yet Intimidating: Socks: Basic Top-Down Socks: Tubes are easy, Turning the heel, Tubes are still easy, Turning the toe Variation 1: Now Let’s Do It Backwards Variation 2: Pointy Toes and Inserted Heel: Casting on, Waste yarn, Finish fancy, Back to the heel Mix and Match: Other Toes and Heels CH8: Knitting Things That are Not Clothing CH9: Knitting Crosswise and Backwards: Entrelac CH10: Other Appendix Dictionary of Knitting Abbreviations Glossary Index Bibliography Further Reading |
|
 RSS Feed